Git Cheatsheet
Currently mostly about basic Git usage for someone who is just starting out with using Git and GitHub for source control.
Right now this cheatsheet covers the steps to do some extremely basic things with Git on the command line, using GitHub as the remote host. It’s overly detailed because I’m trying to learn the details. It’s at beginner level because that’s me.
Use case: you’re (*ahem*) just starting to learn about using Git to collaborate on software development and you plan to familiarise yourself with that by putting your own code into GitHub and messing about with it.
Contents so far
(This post will be updated as [if?] I learn more of the various Git commands and workflows. There is also a copy of this cheatsheet on my GitHub, and I followed these steps to set that up.)
I’m using Git Bash as the terminal app on the Windows side of my computer, and I also use whichever terminal app it is that comes with Ubuntu on WSL2. My Git install was from https://git-scm.com/.
Add existing code to a new GitHub repository
1. Make a new repository on GitHub
On your GitHub homepage, click into Repositories and then click the ‘New’ button. (There’s also an option to make a new branch in the little dropdown that shows all the branches.)
- Choose a name for your new repository and (optionally) add a description.
- Choose a Public or Private repository.
- Skip the step that adds a
READMEfile, a.gitignorefile, and aLICENSEfile.

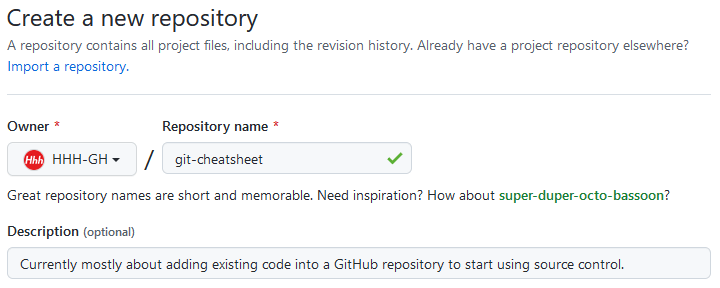
On the next page you’ll see a page with information about your new repository. Keep this page open so you can copy-paste from it in step 4 of this process. You’ll see something like the screenshot here.

2. Generate a GitHub Personal access token
You’ll use the token instead of a password. It’s a long string of text that looks like a complicated password. The token grants access to the repository, and it has an expiry date.
Log in at GitHub, go to the Settings > Developer Settings > Personal access tokens page, and click the ‘Generate new token’ button.
- Write a note about the purpose of this particular token.
- In the section titled ‘Select scopes’, select the ‘repo’ scope.
- Click the ‘Generate token’ button.
- The token will be displayed on the next page. Copy the token into your password manager, or leave the page open so you can copy-paste the token in step 6 of this process.
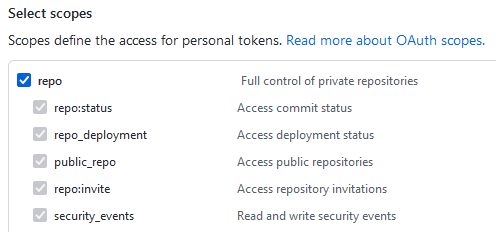
3. Set up the local folder as a Git repository
Set up the local folder to be tracked by Git.
3a. Initialise the local repository
If your code is stored in a folder named git-cheatsheet, open a terminal/prompt in that folder.
The following command initialises a Git repository with a branch named main. (You could call the branch whatever you like, but let’s stick with common practice.)
git init -b main3b. Configure your user name and email address for the new repository
When you push commits from your local repository to the remote repository, the user name and email address you enter here will be recorded as the author of the changes. (You can add the --global flag to set the user name and email address for all repositories on your computer as well, if you’re going to be using the same info for all of your projects.)
git config user.name "HHH-GH"
git config user.email "EMAIL ADDRESS HERE"
The following command lists the current configuration settings.
git config --listType q to exit the list. (sometimes :q)
3c. Create your .gitignore, README.md, and LICENSE.md files, if needed
The .gitignore file tells Git which files to exclude from source control. I’ve often kept old copies of code in a folder named old. Those old copies can be excluded from source control with a line like this in the .gitignore file. (See the Git SCM docs for more on gitignore.)
# Ignore anything in the 'old' directory
old/
README.md is usually an introduction to the project and some notes on how it all works. (Optional but recommended)
LICENSE.md is a license for use of the code. (Optional)
3d. Add all the files and do a first commit
Add all the files to start tracking them in source control.
git add .Make a first commit.
git commit -m "First commit"The -m flag means ‘use the text inside the quotes as the commit message’. The commit message should describe any changes made to the files being committed. Leave off the -m flag, and Git will open a text editor in which you can write a longer commit message.
4. Add the remote GitHub repository as the origin for this repository
On that GitHub web page from step 1 you’ll find the https address for the remote repository. We’re going to link our local repository to that remote repository.
Copy the address of the remote repository and add it as the remote origin for the local repository with the following command. (We’re using my Git Cheatsheet repository for this example.)
git remote add origin https://github.com/HHH-GH/git-cheatsheet.gitType git remote -v to list the remotes for the local repository, if you’re interested. The -v flag means ‘be verbose with the info returned’.

5. Copy all the branch info to the main branch
git branch -M mainThe -M flag forces the move of the local repository’s config and reflog. The command above is taking the updated config info added since step 3a, and using it to overwrite any of the previous info for the main branch. (Or something like that—see the explanation of the -f and -M flags in the docs for git-branch.)
(I’m assuming this only needs to be done this one time.)
6. Push the code in the local repository to GitHub
Send the code in your local repository up to the remote repository on GitHub.
You’ll be asked for a password. Use the Personal access token from step 2.
git push -u origin mainThe -u flag means ‘add upstream (tracking) references’, according to the docs for git-push. It sets the ‘upstream branch for the given branch’, so you can use git push and git pull and git fetch without the extra arguments like origin main.
(I’m assuming this also only needs to be done one time per branch.)

7. Take a look at the results
The files in the local repository will now also be in the remote repository on GitHub.
Make a new branch to work with
Instead of working directly on the main branch, copy the main branch to a new ‘feature’ branch and make changes to that new branch. If the changes work, merge the changes into the main branch and then delete the feature branch. If your changes to the feature branch break everything irreparably you can delete it and start fresh, instead of trying to rewind a whole lot of commits on your main branch.
1. Use GitHub to make a new branch
You can also do this on the command line. Using GitHub is easy mode.
- Click any of the ‘New branch’ buttons in your GitHub
- Give the branch a name that describes what it’s for e.g.
make-the-readme - Choose the source of the new branch i.e.
main
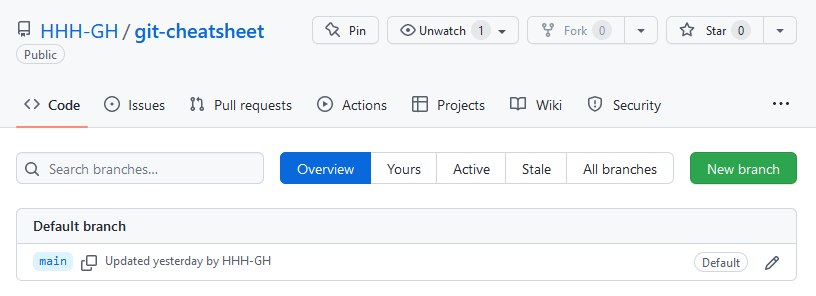
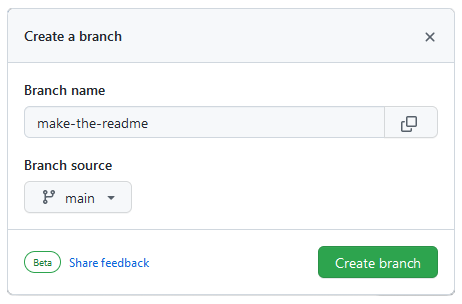
2. Bring the new branch into your local repository
2a. Get updates from the remote repository
git fetch origin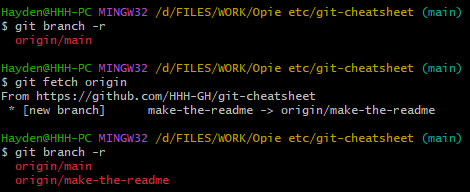
git branch -r command before and after git fetch.2b. Check that the new branch is available
git branch -rThe git branch command shows the local branches. Adding the -r flag shows the remote branches. At this point, if you run git branch you won’t see the new branch in your local repository.
2c. Make a local copy of the new branch
git checkout -b make-the-readme origin/make-the-readme
make-the-readme.Now if you run git branch you’ll see your local repository has a copy of that new branch for you to work with.
Do your work, git add the changed files, git commit them with a descriptive commit message, and then …
3. Send any updated files up to the remote repository
Push updated files to the remote repository after you’ve added and committed them.
git pushDid it work? View the new branch on GitHub to see if your changes have been synced.
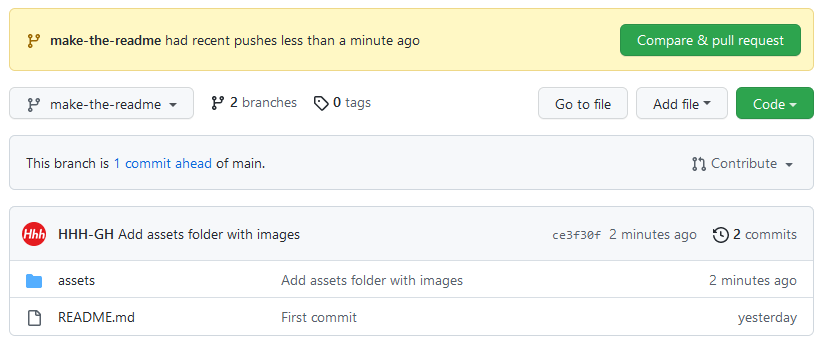
4. Bonus: use the command line to make a local branch and send it to the remote repository
(If you are not the owner of the remote repository you’ll need to be added as a contributor by the owner before you can do this.)
In this example a branch named readme-updates is created using the main branch as a base, and then pushed to the remote repository.
git checkout -b readme-updates origin/main
git push -u origin readme-updates
The -u flag is being used to add upstream tracking references.
Merge your feature branch into your main branch, and delete the feature branch afterwards
To bring changes from a feature branch into your main branch use the git merge command on the command line, or do a Pull Request on GitHub.
1. Remind yourself of the branch names
git branch
2. Checkout the main branch, and make sure it is up to date
git fetch and git pull are used to get the most up to date version into your local repository.
Checkout the branch that you will merge into. (This example will merge make-the-readme into main.)
git checkout main
3. Merge it
git merge make-the-readme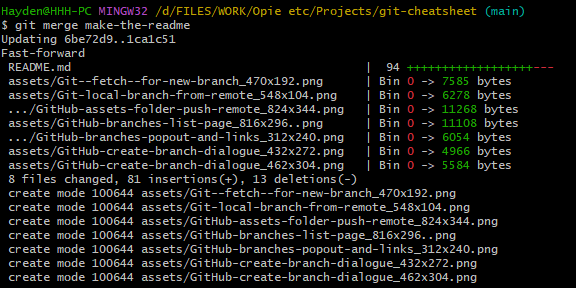
That was a merge where everything went smoothly.
4. Push the updated version of main up to the remote repository
git push
Did it work? View the updated branch on GitHub to see if your changes have been synced.
5. Delete the feature branch
The feature branch is no longer needed. Delete it from your local and remote repositories.
5a. Delete the feature branch from the local repository
git branch -d make-the-readme5b. Delete the feature branch from the remote repository
git push origin -d make-the-readme
In the preceding command, origin is the name of the remote repository. Use the git remote -v command to confirm that if needed.

5c. Update your lists of branches
git fetch --all --prune5d. Check the local and remote lists of branches
git branch
git branch -r
The changes made on the feature branch have been merged into main, and the feature branch has been deleted.
Amending a commit
Use this if you forgot to include a file in a commit, or if you spotted a typo just after you made a commit.
git add .	// After you've fixed the typo
git commit --amend --no-edit
The --amend option adds the changes to the previous commit.
The --no-edit option prevents Git opening the previous commit message for edits.
The Experts say ‘Don’t do this if you have already pushed your changes’.
I agree, even though I am not an expert.
Don’t bother doing this if you’ve already pushed the commit to the remote repository.
If you do, you’ll probably have to fix conflicts because ‘the tip of your current branch is behind its remote counterpart’, and that means you’ll end up with an extra commit message anyway.
So if you spot a typo and you’ve already pushed the commit, you might as well do a new commit with a commit message like typo lol instead of something like Merge branch '42-wechat-posts-auto-generated-qr-code' of https://github.com/HHH-GH/bjh-ee-site-templates into 42-wechat-posts-auto-generated-qr-code, which is the kind of thing that Git is going to suggest for the commit message after you 1) pull the remote repository, 2) fix the conflicts, and 3) merge them.
References
The ‘Add existing code to a new GitHub repository’ part of this post was synthesised from:
- GitHub’s Adding locally hosted code to GitHub docs (github.com)
- Karl Broman’s Start a new git repository guide (kbroman.org)
